How the Sausage is Made! - 8 Steps to Create a Picture Book
Originally Published on X on May 28, 2025
I am frequently asked a question: How do you actually write a children's picture book?
Since many of you have been following this journey, I wanted to pull back the curtain and show you exactly how my book "Rocket Science for Kids" came together — from first manuscript to the beautiful pages you'll soon be able to hold.
The book will be published on July 1st and is available for pre-order on Amazon.
Check out this animation I created of the process for a single page — start to finish!
The Complete Picture Book Creation Process
1. Manuscript
I created my first manuscript around 2020, during the early stages of the pandemic. I'd been thinking about this rocket science book idea since 2016, but had never written down all the words.
The pandemic made me pull the trigger. It was very hard to start from a blank page, but ultimately, this step was surprisingly straightforward. (Turns out the cliche of "starting is the hardest part" is very, very true.)
Unlike a novel, where finishing the draft manuscript means you're 50% done with the project, with a picture book, the words are maybe only 5% of the book's content.
2. Illustration Notes
The next step is to describe what you want the illustrated page to look like.
If you already have the skill to illustrate your own book, then this step would be easier. But I'm an engineer, not an artist, so I decided to find a partner for the illustrations. You can find and interview great illustrators at marketplace websites like reedsy.com.
I was very fortunate to find Laura Fearn, my illustrator. She is very experienced and has been invaluable in translating my ideas and instructions into real, beautiful watercolor pages.
Creating illustration notes is a challenge because you must get the ideas out of your head and into the artist's head. The instructions must be actionable and effectively communicate your vision. This is no easy feat!
For this step, I used three main tools:
PowerPoint
Windows Snipping Tool
Google Image Search
This may seem basic, but with these three tools, you can quickly create simple mock-ups of your ideas. In aerospace, I've created many official work instructions just using PowerPoint and the Snipping tool. PowerPoint is a good image-handling tool — it lets you easily add arrows, icons, floating textboxes, etc. Some Google kung fu can provide reference pictures to help communicate your vision. Then, snip and crop the image and add it to your illustration notes.
I repeated this for every page in the book to convert my text-only manuscript into a mock-up of a picture book.
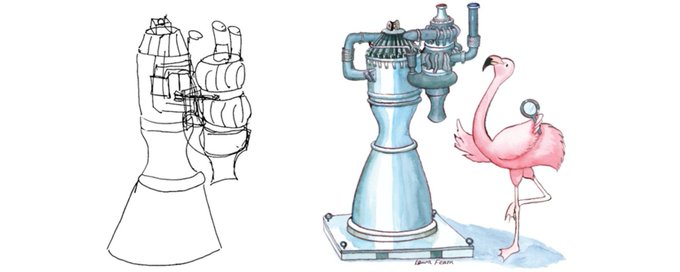
3. Illustration Sketch
After I created a simple mockup of what I thought the page should look like, my illustrator, Laura, would create a hand-sketch of the scene. This would get us in the ballpark. Based on the initial sketch, I would provide feedback on whether it looked good or if we needed to make any fundamental changes to the scene. In that case, I would go back and create additional illustration mock-ups or rewrite the chapter to improve its flow and clarity. And then we would repeat the process.
Pages with differing size scales were challenging to get right. Those pages that had to convey motion were also especially difficult to translate into static images suitable for a children's picture book. It took many rewrites and much pondering to get these pages right.
This step is where I would also give technical accuracy feedback on the sketches. My mockup pictures were never "exactly" like the ideas I had in my head. Sometimes the sketches had too few or too many details. We had to simplify things a lot, but not too much!
My main tool at this stage was giving feedback via Loom videos. Looms are invaluable for giving complex feedback and commentary. Way faster than attempting to provide complex feedback via written text alone! Depending on the complexity of the page and how well I communicated, we would make 1-2 additional iterations or edits of the sketch before moving on to coloring.
4. Illustration Coloring
After the sketch was "finalized," the next step was coloring. Laura would take the latest sketch and color it using watercolor.
After coloring, it was harder to edit the images, so this step was delayed until we felt there were no further fruitful changes to be made to the sketches. This step was more deterministic, as (most of) the editing was already completed.
Sometimes, seeing the pages in full color revealed issues that weren't apparent in the sketches — colors that didn't work together, elements that got lost, or details that needed more contrast to be visible to young readers.
Sometimes, I would discover a technical accuracy error that was missed from an earlier step. For example, I discovered that in the turbopump illustration, the Fuel and LOX pumps appeared to be rotating in the wrong direction for the shape of their impeller blades. Can't have THAT technical detail confuse the kids :)
Depending on the page, we would make 0-1 more iterations or edits to the coloring before declaring the page "done." We would then repeat this for all pages of the book.
5. Final Layout
In the previous step, we were primarily focused on creating the artwork, rather than the words. Each illustration was created with space considerations for text, but now it was time to finalize the text and the text placement.
Since this was a children's picture book, I spent considerable time ensuring that the text was positioned near the objects it described, while also considering the natural flow of reading — left-right word order, and up-down visual balance.
This step is also where I did extensive test readings with kids. The text from the manuscript from years ago had likely been rewritten two to three times by this point in the book's development. However, those edits mainly focused on a page-by-page or inner-chapter perspective. Getting the ENTIRE book into one continuous flow revealed the next level of readability problems. Creating the best rocket science for kids book is a serious endeavor. I wanted it to deliver on its promise of teaching your kids actual rocket science without the baby talk!
Based on the test readings, I polished and agonized over every word and every sentence. In the final few months, I probably edited and reduced the word count by 25% again to create the most crisp and easy-to-read book that I think is possible. Compared to my initial readings with kids, clarity and comprehension were improved beyond what I thought was even possible. This perfectionism shows itself in the quality of the book. I think this book is easily the best 1000-word introduction to real rocket science that has ever been put to print.
6. Compilation and Print-Ready Files
We are now nearing the finish line.
The book was coming together with illustrations and text "done." But after completing the 40+ illustrations for the interior, we also created the imprint page, table of contents, final page, bonus page, and bios for the author and illustrator. The cover required its own separate design process, combining the front, back, and spine into a single wraparound image.
The cover file and interior files are separate submissions to the publisher, each with different technical requirements.
The PDF must be formatted EXACTLY as the publisher wants. The formatting guide was over 40 pages of detailed instructions. This involved a significant amount of manual labor, including setting up export settings and compiling files with precise margins, bleeds, color profiles, and resolution requirements, and then combining them into one giant master PDF for the publishing house. I'm very grateful to my illustrator, Laura, for managing this!
These master PDF files are then uploaded to the publishing house to be printed into a real physical book.
7. Print
Now we are really getting close to the finish line.
I ordered pre-release physical copies for review, also known as proofing copies. Despite my meticulous care and reading and re-reading the master files a dozen times, several minor errors and a typo made it through to the printing stage. Ugh!
After waiting patiently for weeks to receive the physical book, discovering these mistakes was pretty disheartening. But on the bright side, this is the value of proof copies!
We fixed the errors and typos, updated the last 1% of wording fixes, and created new master PDFs. Then I ordered another round of physical copies for review.
The feeling of finally holding a physical copy, after years of digital files, felt truly surreal!
You can see how messy the process was. It was highly non-linear! Steps 1 through 7 were actually repeated over and over, looping back onto themselves. But the end product is worth it! I dare say the book is perfect! No more changes will be made.
8. Publish
After five years of hard work, my illustrator and I have created an authentic and captivating book that explains rocket science in simple language that anybody (young or old) can understand!
The last step is to share it with the world!
The launch date (pun intended) is set. Rocket Science For Kids for kids will be released on Amazon on July 1st and is available for preorder.
The ultimate irony is now that the book is done. I'm actually only 50% done! I still have to market and promote the book.
I look forward to this next phase of this adventure. This book will be timeless, and I am confident that it will remain in demand for decades. I'm committed to helping children all over the world discover the joys of engineering and rocket science.
Closing Thoughts
To be completely honest, all these steps I described were profoundly difficult. In his book "The War of Art," author Steven Pressfield describes a concept known as the "Resistance." The Resistance is that part of our brain that says "STOP" and challenges us when we start any artistic endeavor. Well, I can definitely say that my Resistance created A LOT of self-doubt over the years of this project.
During this project, I experienced intense feelings of fear, doubt, guilt, anguish, and regret, among others.
It sometimes took immense energy just to look at the sketches I would get from my illustrator. Then I would feel another immense sense of guilt because I didn't like them; I felt they needed to change, but I also didn't know exactly what needed to change. They just seemed "off." It would sometimes take me days to figure out what needed to change to improve the page. This would trigger another intense wave of guilt, as I felt I was taking too long to reply to my illustrator.
Ugh! Being an artist is hard! I have immense gratitude for Laura's patience with me!
These trials and tribulations are likely old hat for the veteran artists, who have been creating artistic works for years. But these feelings were BRAND NEW for me— a strong, masculine, seasoned aerospace engineer. Engineering technical skills are distinct and separate from artistic courage.
It was very eye-opening! Attempting to write a book was an emotional rollercoaster. Being an artist is no joke, and is way, way harder than I ever thought! I thought it would be harder than I expected, and it was even harder than that!
But what matters is that I persevered and did not let the Resistance win!
The book will be published! It will help so many kids! And I couldn't be more excited!
The book is available for order on Amazon.
If you found this content valuable, let me know. I love hearing from my fans!
Please share this with others who might enjoy the behind-the-scenes look at what it takes to create a one-of-a-kind children's picture book.
Follow along at rocketscienceforkids.com.
Best,
--Russ

X
LinkedIn
Facebook
Instagram
Youtube